

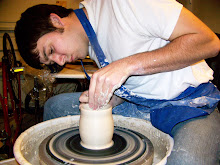
Tomorrow is Lindsay's first day back to school with students, so I have been helping her set up her classroom for the past few days. I must say, she puts together a fantastic room that really looks like a great place to learn! When I wasn't helping her, going to work, sleeping, or eating, I was in the studio messing around with faceting bowls. I must say that I wish I tried this sooner--it is a ton of fun! I have to credit Tim See for giving me a boost to try it, as well as the Etsy Mud Team (a lot of the members saw Tim's video a while back and tried it before me). I faceted a couple of tumblers at the leather hard stage a while back, but I just tried Tim's technique several days ago. All you have to do is throw a fat wet cylinder, cut some facets, and push from the inside into the shape that fits.
 (I do plan on cleaning this up at the bone dry stage)
In other news, I finally made it to the ceramic supply to buy some chemicals, although I don't have an ETA. I really can't wait to get to testing. Hmmm...I should really get some test tiles ready. I've been thinking of making cylinders and tying them on ropes to hang on the wall--I've grown tired of standard L shaped tiles. What kind of test tiles do you use?? Any really great recommendations?

I usually throw small bowls off the hump as test tiles. I texture the outside & then I can see how the glaze reacts on a smooth (inside) surface & outside on the texture. The bowl shape just gives me more info.
ReplyDeleteAlso I've just discovered faceting -- and I love it. Your bowl is very cool.
Thanks Judy! I hadn't thought about bowls! Do you leave them out where you can see them?
ReplyDeleteThis will give you an L sort of, but it gives you a lot of test tiles fast-maybe you do this alreay-throw a low, wide cylinder. Make it as high as you want your tiles. remove the bottom of the clylinder but leave a half inch or so by the wall. Same outside, don't clean it up all the way to the wall. This will be your stand for your tiles. When this is a soft leatherhard,cut it into pieces as wide as you want your tiles. I usually press something into the outside of eachone to I can check for glaze breaking and pooling. You can also punch a hole for hanging at this point.
ReplyDeleteOnce I test the initial glazes however using these tiles, if I am trying to get a feel for how they would look on pots and interact with other glazes then I use tiny cups thrown from the hump. Hope this helps.